Mental Ray for Maya Subsurface Scattering Candle Wax for 3D Candle Animation Tutorial
 For a recent arts animation I was required to create a melting candle. I'd not worked with subsurface scattering before although knew that subsurface scattering would be the best way to achieve the most realistic candle wax possible. I found technical reference quite thin on the ground when looking for information about using Mental Ray's Subsurface Scattering Shaders; specifically using Mental Ray's misss_fast_shader to create the translucent candle wax I required.
To help anyone looking to produce candle wax using Mental Ray's Subsurface Scattering Shaders I started the 3D animation project from scratch; created a new candle and the following step by step tutorial explaining how I went about it.
Additional to the lighting, shading and rendering of the candle wax and the candle's wick, I'll also explain how I modelled and animated the candle and the candle's wick.
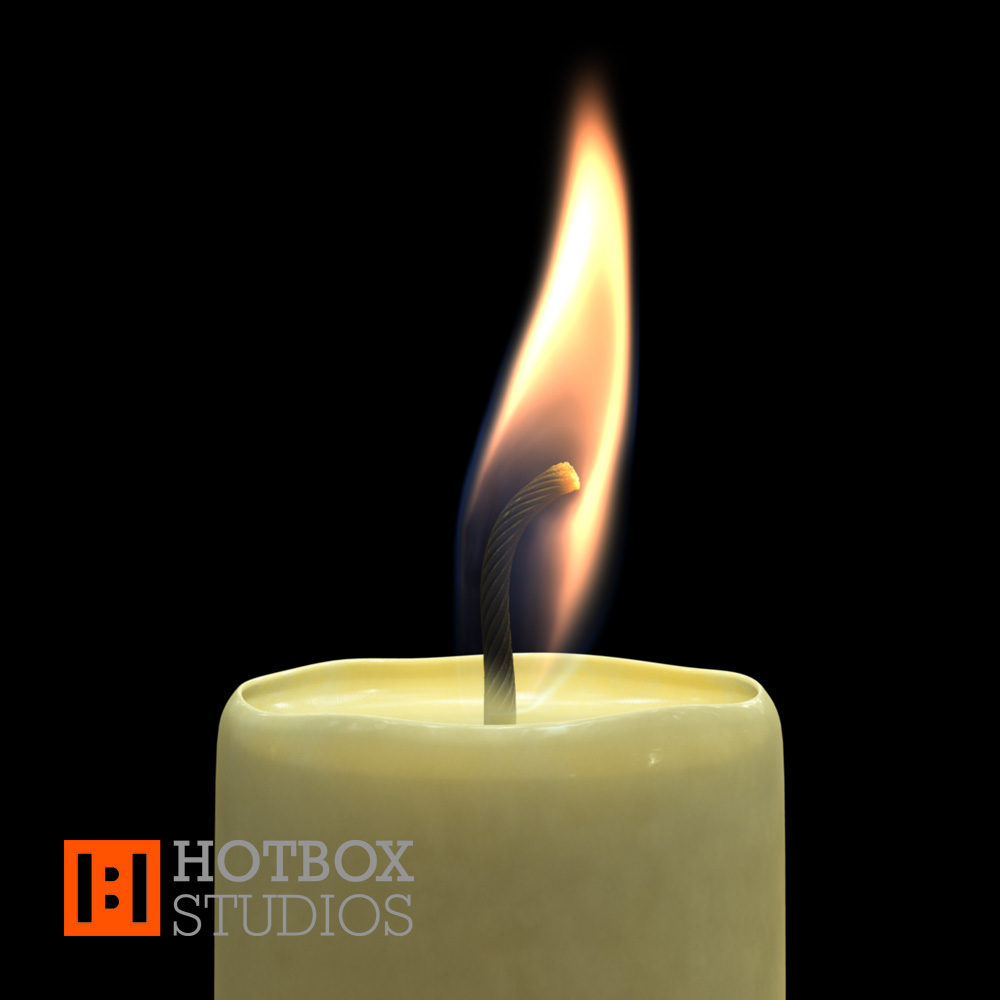
For the same project I needed a candle flame. The candle flame you'll see within this tutorial was created using Maya's Fluid Dynamics. I'll write this up as a separate tutorial and add a link to it here once the fluid dynamics candle flame tutorial is online.
The candle animation was created using Autodesk Maya 2012 x64. When not procedurally created within Maya source images were created using Adobe Photoshop CS4 64bit. The candle animation was rendered using Mental Ray for Maya and RenderPal V2. Editing and compositing was achieved in Adobe After Effects CS4. The original project was mastered to Blu-ray, for this I used Adobe Encore CS4 and ImgBurn.
Candle, wick and flame reference
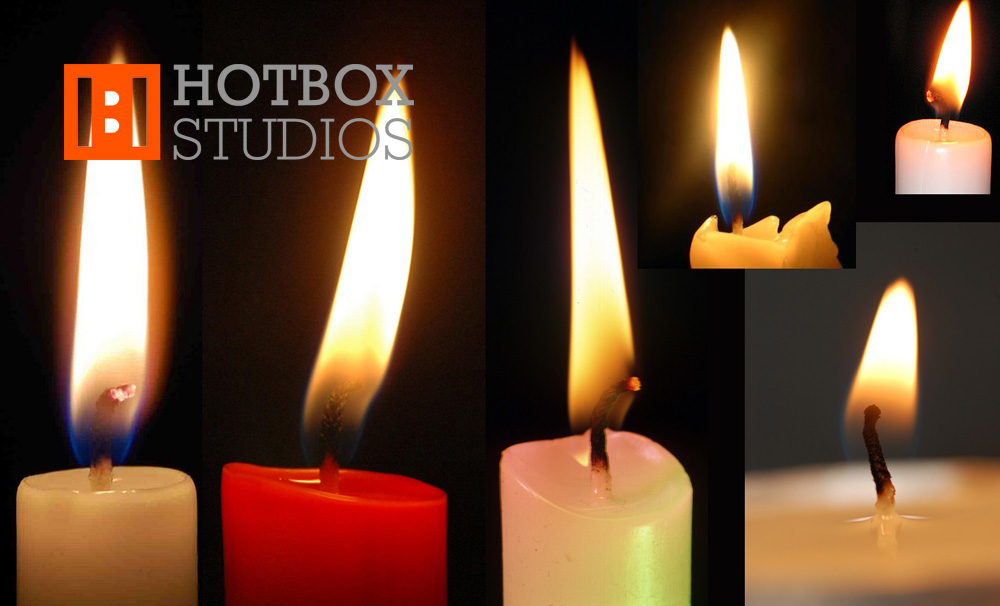
 As with most projects the best way to start is to find some good reference material. There is a near endless supply of photos and videos of candles and candle flames on the web so I advise first spending some time having a search for some you like. Once I'd decided on my favourite images - the styles I liked and those showing the different elements of a candle, its wick and flame - I composited these together for ease of reference.
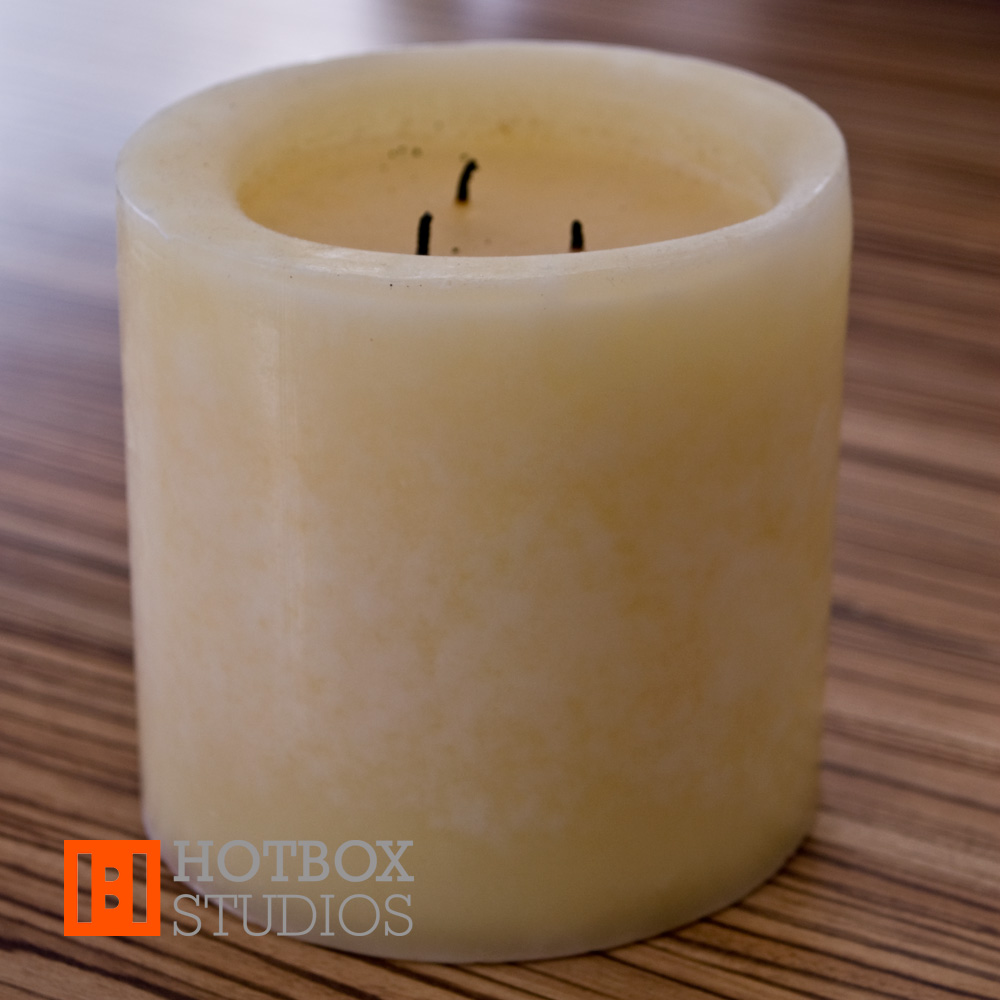
Although the photos had much of the shape and texture reference I was looking for, they were a little plain. I have a candle at home which has the dusty mottled texture you sometimes find on larger candles, this I brought into the studio and sat on my desk. It proved invaluable when producing both the candle's model and texture.
Setting up the render cameras
The first thing to do was setup the camera. The shot the animated candle was to be used within was locked so an easy task which then allowed me to model the candle to the camera. I setup the render camera including an image plane of the background and a test camera. The test camera is the camera I've used for the rendered stills and animation within this tutorial - a close-up allowing the finer detail to be seen.
Hint: Key your cameras at frame 1 so you can revert to overcome accidental translation.
Modelling the candle using Maya's Non-Uniform Rational B-Splines (NURBS)
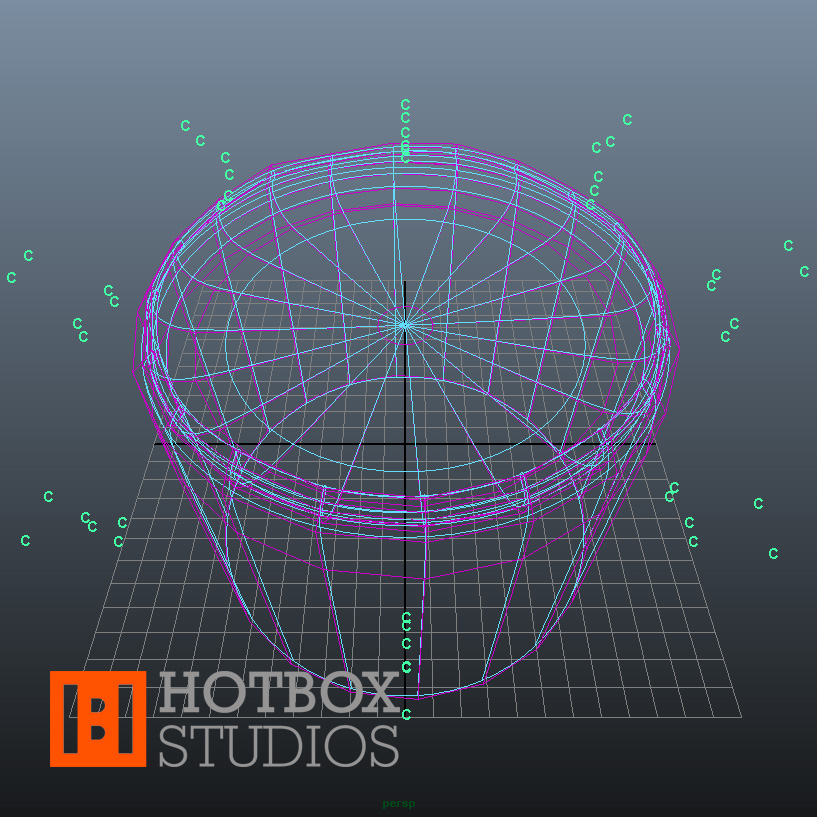 Due to its smooth organic nature I decided on NURBS for the candle model. Starting with a NURBS sphere I split the surface around the centre, extruded the lower section into the body of the candle, added Isoparms and used the surface's Hull to pull out the basic shape of the candle's lip and crater (the pool of molten wax around the candle's wick).
Once the basic shape had been created I transformed the Control Vertices (CVs) around the lip to create the wavy upper edge. I modelled this area manually by grouping CVs into clusters - not the fastest way of working but it allowed for controllable fine tuning of the candle model's lip.
To finish off the candle model I pulled out the molten crater to create the concave inner edge of the candle's lip. This is an important step as the reduction in surface thickness allows for more light to pass through the surface where the candle wax is at its thinnest between the candle's body and candle's lip.
Animating the candle melting using Maya's Blend Shapes
The animation project I produced the first candle for didn't require the candle to be very large in shot, so I didn't need to worry about lots of detail when it came to the candle melting e.g. the drips of wax down the candle's sides or the pool of molten wax around the candle's wick. I did need the candle to reduce in size and with this the lip of the candle to deform.
Before I started animating the candle I created a stand-in wick and flame (using simple NURBS primitives). The candle, its wick and the flame were required to burn out of shot so I needed to approximate the height of the candle's wick and flame. Once I'd modelled these I grouped them with the candle.
To create the effect of the candle melting I used a Blend Shape. I duplicated the first candle model then remodelled the lip of the duplicate candle - tweaking the CVs to create a variation on the wavy edge. I then created a Blend Shape between the two models, keyed the blend and the Y-axis translation of the group.
Modelling the candle's wick using Maya's Non-Uniform Rational B-Splines (NURBS)
As with the candle model I created the candle's wick by splitting a NURBS sphere around the centre and extruding the lower section. As I needed to animate the wick as it burnt I then skinned the surface to a simple joint chain and used Forward Kinematics (FK) to bend the wick into its initial shape.
The surface detail of the candle's wick including the rope like centre section and fractal like burning tip; is part procedural and part image based displacement mapping, rather than modelling. I'll talk more about this within the section below titled Shading and displacement of the candle wick using Mental Ray's misss_fast_shader Subsurface Scattering Shader.
Animating the candle's wick using Forward Kinematics (FK)
With the Forward Kinematics (FK) and skinning complete, to make animating the candle's wick easier I created a Set Driven Key (SDK) to control the bend of the candle's wick; the rotation of the candle wick joints (driven) linked to the Z rotation attribute of a locator (driver).
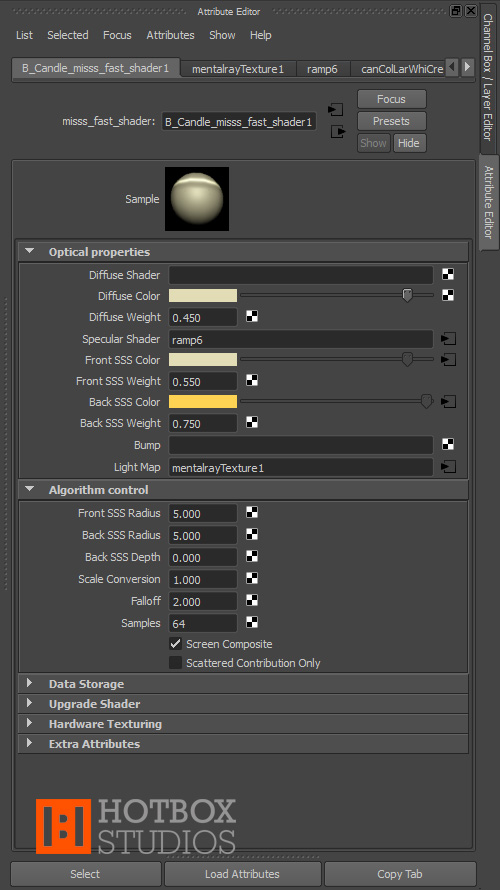
Shading the candle wax using Mental Ray's misss_fast_shader Subsurface Scattering Shader
 As noted above, whilst working on the 3D candle I placed a real candle on my desk that I liked the look of. Alongside the candle photos from the web this allowed me to reference real candle wax colour, texture and how the candle wax reacted to light. I chose the candle pictured as it had an interesting and varied texture; some areas clearly allowing light to pass through, others not due to imperfections and the candle's chalky surface.
To create the candle wax shader I used Mental Ray's misss_fast_shader as the base. I'll go through the optical properties and algorithm control below.
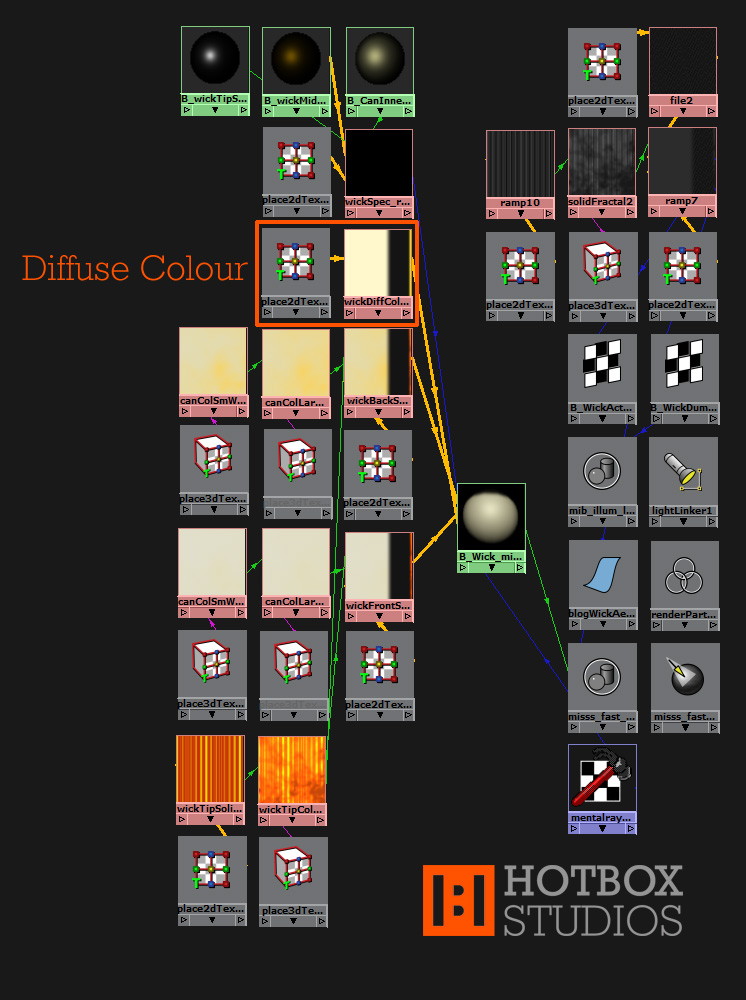
Candle Wax Diffuse Colour
The diffuse colour is the colour of the light that is reflected diffusely from the surface; light that hits a surface; does not penetrate and is reflected at many different angles (unlike specular reflections where the light is reflected at the angle at which it hits the surface). I set the diffuse colour to H52.0 S0.199 V0.886. This is a cream colour similar to the candle shown in the photo.
Candle Wax Diffuse weight
The diffuse weight I set to 0.450. Although the majority of the candle wax colour is to come from inside of the candle (light passing into the candle, scattering and coming back out again) thus defined by the Front SSS Colour and Back SSS Colour attributes; due to the imperfections and chalky texture there is a diffuse element to the way in which light reacts with the candle's surface.
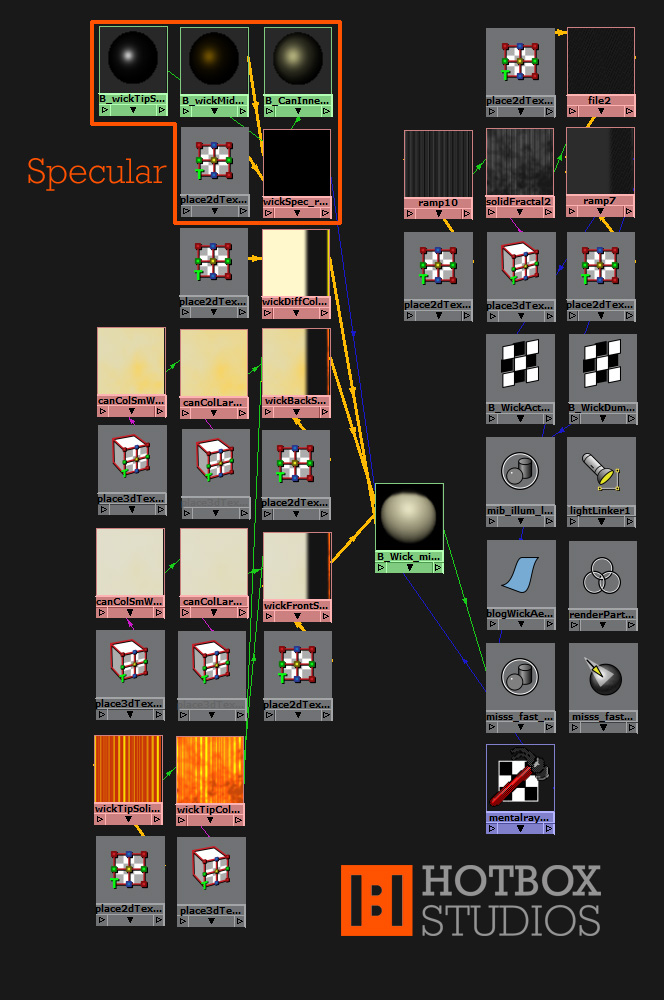
Candle Wax Specular Shader
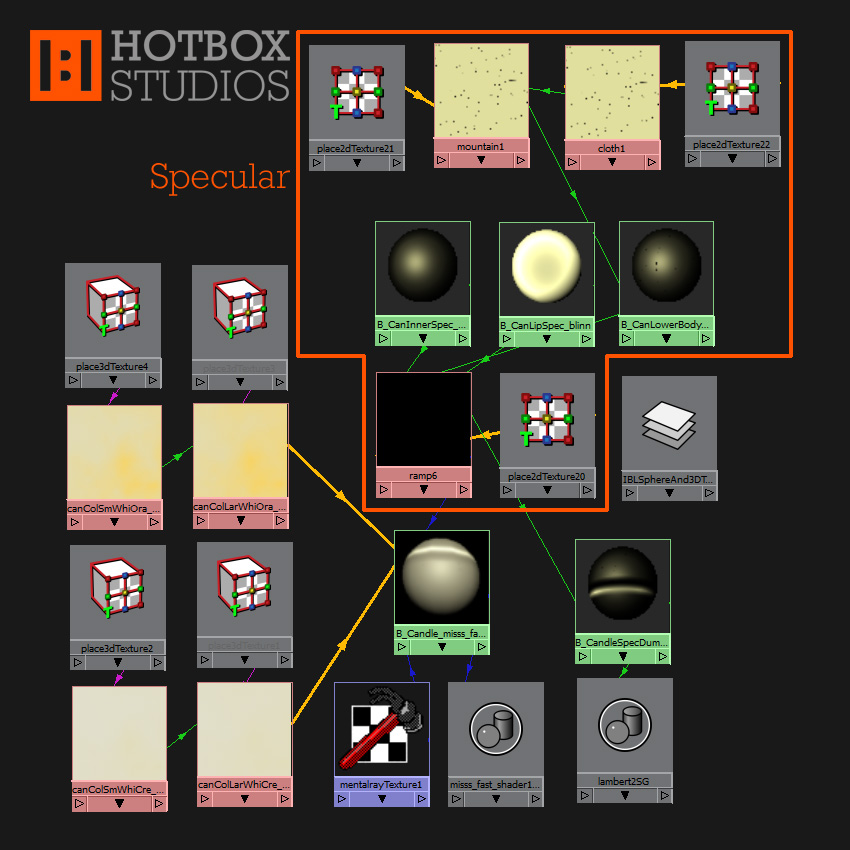
 As you can see in the candle photos; candle wax's specular attributes are not consistent across a candle's surface. To mimic this I separated the specular components into three areas: candle body, candle lip and the inner molten wax crater of the candle (the area around the candle's wick).
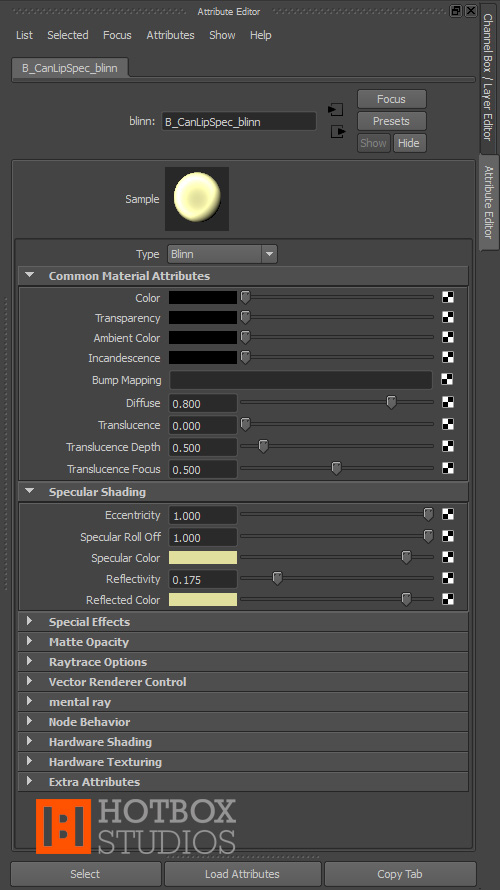
For the specular shading of inner molten wax crater of the candle I used a Blinn shader. The specular shading attributes set as below (attributes not listed set to 0 or black as I only needed the specular component):
Eccentricity: 0.450
Specular Roll Off: 0.750
Specular Colour: H58.0 S0.302 V0.882
Reflectivity: 0.095
Reflected Colour: H58.0 S0.302 V0.882
For the specular shading of the candle's lip I again used a Blinn shader. The specular shading attributes set as below (attributes not listed set to 0 or black):
Eccentricity: 1.0
Specular Roll Off: 1.0
Specular Colour: H58.0 S0.302 V0.882
Reflectivity: 0.175
Reflected Colour: H58.0 S0.302 V0.882
For the specular shading of the candle's body I also used a Blinn shader. The specular shading attributes set as below (attributes not listed set to 0 or black):
Eccentricity: 0.455
Specular Roll Off: 0.756
Specular Colour: Procedurally driven as below.
Reflectivity: 0.020
Reflected Colour: H0.0 S0.0 V0.0
On examining the candle’s surface I noticed a lot of fine detail - scratches, lumps and imperfections - all of which affected the way in which light reacted to the candle wax (generally diffusing reflections). I sketched these and replicated the effect by mapping two procedural textures to the Specular Colour attribute of the Blinn shader - the imperfections replicated by cutting the specular reflection via black lines and dots.
I created a 2D cloth texture with attributes:
Gap Colour: H58.0 S0.302 V0.882
U Colour: H58.0 S0.302 V0.882
V Colour: H0.0 S0.0 V0.0
U Width: 0.000
V Width: 0.015
U Wave: 0.000
V Wave: 0.000
Randomness: 0.750
Width Spread: 0.000
Bright Spread: 0.000
I mapped the 2D cloth texture's into a 2D mountain texture:
cloth.outColor > mountain.snowColor
The mountain texture with attributes set as below:
Snow Colour: mapped from cloth texture
Rock Colour: H0.0 S0.0 V0.0
Amplitude: 0.500
Snow Roughness: 0.400
Rock Roughness: 0.707
Boundary: 1.000
Snow Altitude: 0.200
Snow Dropoff: 3.000
Snow Slope: 0.800
Depth Max: 20.0
I then mapped the 2D mountain texture's colour into the candle body's Blinn shader:
mountain.outColor > blinn.specularColor
 It is worth noting here that when working with procedural textures; especially those with very subtle details and/or colour changes; it's easier to design the textures with more prominent contrasting colours e.g. red, green and blue. Once you're happy with the effect you can then change the colours to better approximate the texture you're trying to produce.
With the three separate specular shaders for the candle wax now setup, I created a 2D ramp shader and mapped the ramp's colour output to a dummy Lambert shader applied to the candle model:
ramp.outColor > lambert.color
With three prominent contrasting colours (each representing one of the three specular shaders) set to the 2D Ramp texture's colour entries the dummy Lambert shader allowed me to adjust and test the positioning of the specular components faster and more accurately than if I had used the actual specular shaders applied to the misss_fast_shader.
Once I was happy with the general positioning of the specular components on the 3D candle model I mapped the colour output from each of the three specular shaders to their respective ramp colour entries:
candleBodySpecular_blinn.outColor > ramp.colorEntryList[0].color
candleLipSpecular_blinn.outColor > ramp.colorEntryList[1].color
candleInnerSpecular_blinn.outColor > ramp.colorEntryList[2].color
I then mapped the ramp's output to the specular attribute of the candle's subsurface scattering shader:
ramp.message > misss_fast_shader.specular_illum
Candle Wax Front SSS Colour
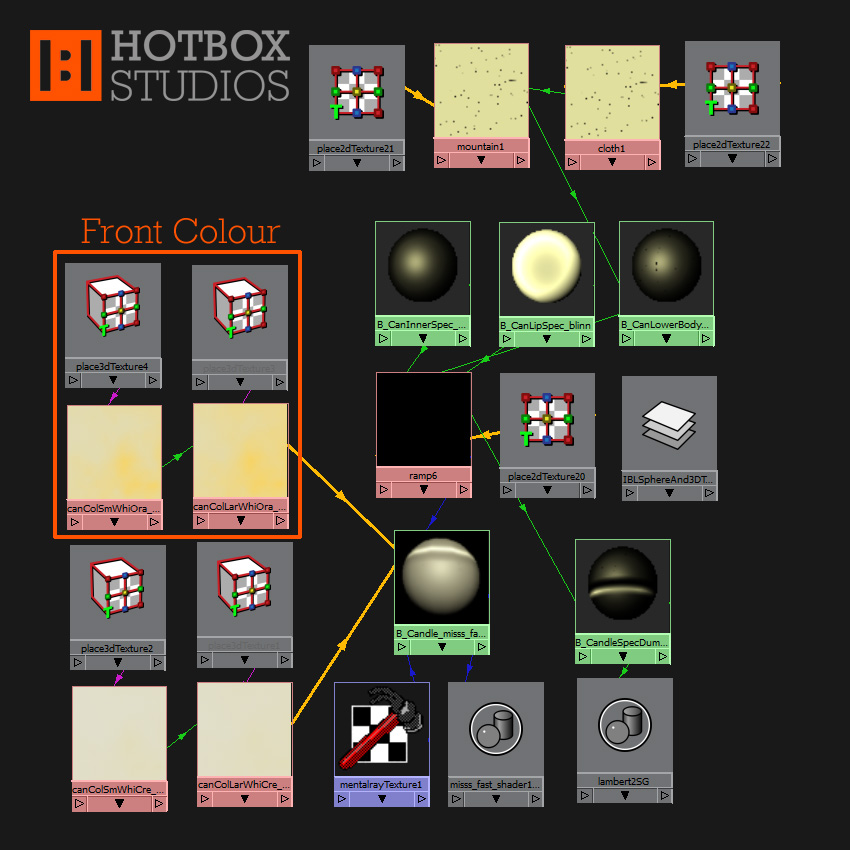 The Front SSS Colour is the colour or colours of light that is scattered from the areas of the surface facing the camera - basically the areas of the surface you can see when looking through your render camera in the viewport.
The candle texture I'm looking to create is similar to that of the photo on my desk. Much of the surface of the candle is lightened due to a cloudy chalk coloured surface discolouration. Looking at the candle side-on with light passing through the candle; the volume is also shown to be cloudy due to being composed of a mix of a clearer creamy wax broken up by cloudy areas closer in colour to the chalky surface.
To replicate this, the candle wax Front SSS Colour is composed of two 3D textures representing the light passing into the candle from the surfaces facing towards from the camera and influence of the two different textures within the candle's volume. The first 3D Stucco texture defines the larger cloud like texture. The second 3D Stucco texture is a scaled down version of the first 3D Stucco texture which adds further detail to the chalky areas within the first 3D Stucco texture.
I set the attributes for the first 3D Stucco texture to:
Shaker: 20.00
Channel 1: H52 S0.199 V0.886
Channel 2: > second 3D Stucco texture.
Then mapped this to the Front SSS Colour attribute of the candle's subsurface scattering shader:
stucco.outColor > misss_fast_shader.front_sss_color
stucco.outAlpha > misss_fast_shader.front_sss_colorA
I set the attributes for the second 3D Stucco texture to:
Shaker: 4.000
Channel 1: H52 S0.199 V0.886
Channel 2: H51 S0.1 V0.886
Then mapped this to the Channel 2 attribute of the first 3D Stucco texture:
stucco.outColor > stucco.channel2.
The scale of your 3D texture placement nodes will depend on your candle model but the ratio between the two textures should be about the same as mine. The scale in the XYZ of my first Stucco texture I set to 8.000, the second 0.400.
Candle Wax Front SSS Weight
The Front SSS Weight controls how much the Front SSS Colour component contributes to the final result. Try and keep the total of Diffuse Weight and Front SSS Weight to 1.0. I set Front SSS Weight to 0.550.
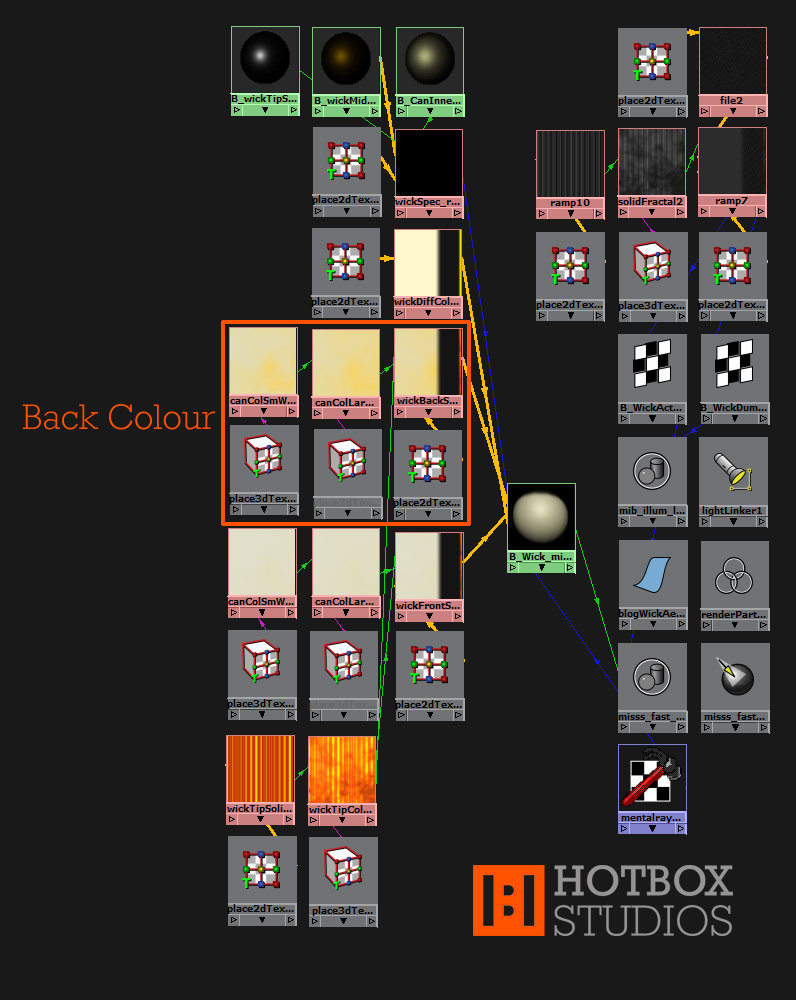
Candle Wax Back SSS Colour
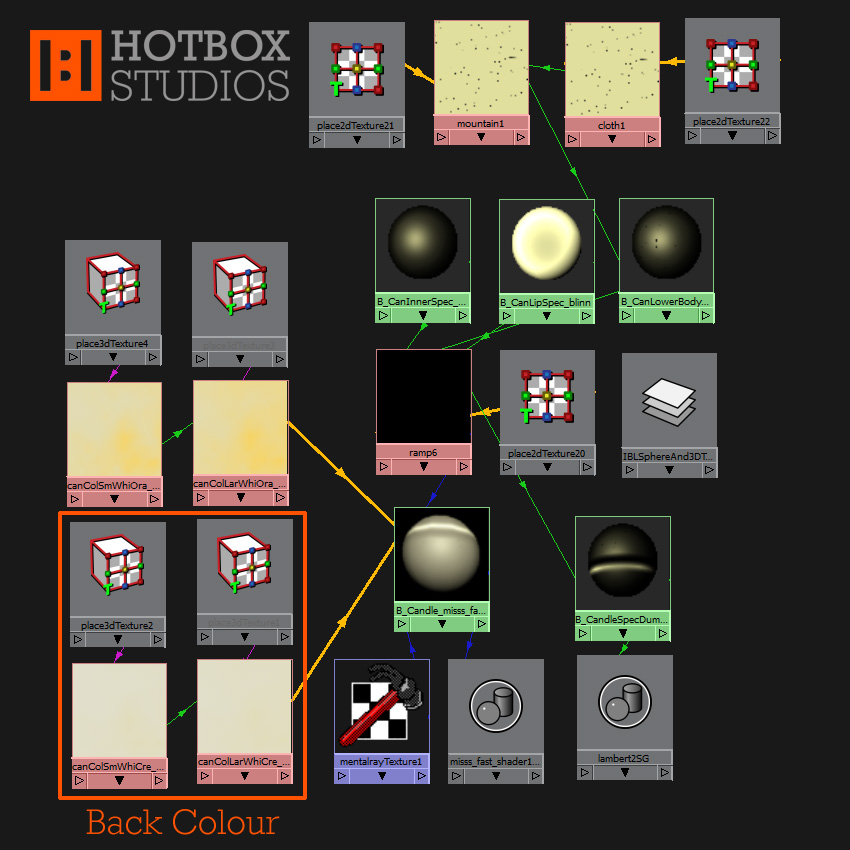 The Back SSS Colour is the colour or colours of light that is scattered from the areas of the surface facing away from the camera - generally the sections of the surface you can't see when looking through your render camera in the viewport.
As discussed above the volume of the candle is composed of a mix of a clearer creamy wax interspersed by lighter chalky cloud like areas.
The candle wax Back SSS Colour is again composed of two 3D Stucco textures representing the light passing into the candle from the surfaces facing away from the camera and influence of the two different textures within the candle's volume. The first 3D Stucco texture defines the larger cloud like texture - separating the clearer creamy wax from the chalky areas. The second 3D Stucco texture is a scaled down version of the first 3D Stucco texture which adds further detail to the chalky areas within the first 3D Stucco texture. I set the attributes for the first 3D Stucco texture to:
Shaker: 20*
Channel 1: H45 S0.693 V0.996
Channel 2: > second 3D Stucco texture.
Then mapped this to the Back SSS Colour attribute of the candle's subsurface scattering shader:
stucco.outColor > misss_fast_shader.back_sss_color
stucco.outAlpha > misss_fast_shader.back_sss_colorA
I set the attributes for the second 3D Stucco texture to:
Shaker: 4.000*
Channel 1: H45 S0.693 V0.996
Channel 2: H52 S0.199 V0.886
Then mapped this to the Channel 2 attribute of the first 3D Stucco texture:
stucco.outColor > stucco.channel2
*the Shaker attributes of the Back SSS Colour 3D Stucco textures are identical to the Shaker attributes of the Front SSS Colour 3D Stucco textures. In combination with the scaling of the 3D texture placement nodes this allows the lighter chalky areas on the front and back surfaces to continue into and be multiplied by the chalky areas within the candle's volume.
As with the Front SSS Colour the scale of your 3D texture placement nodes will depend on your candle model but the ratio between the two textures should be about the same as mine and identical to the scaling of your Front SSS Colour 3D texture placement nodes. The scale in the XYZ of my first Stucco texture I set to 8.000, the second 0.400.
Candle Wax Back SSS Weight
The Back SSS Weight controls how much the Back SSS Colour component contributes to the final result. I set Back SSS Weight to 0.750.
Candle Wax Front SSS Radius
The Front SSS Radius controls the distance that light can scatter along the front of the candle geometry. I set the candle Front SSS Radius to 5.000.
Candle Wax Back SSS Radius
The Back SSS Radius controls the distance that light can scatter along the back of the candle geometry. I set the candle Back SSS Radius to 5.000.
Shading and displacement of the candle wick using Mental Ray's misss_fast_shader Subsurface Scattering Shader
 For reference when creating the candle wick shader I used a selection of the candle photos I referenced when developing the candle wax shader plus some additional close-up photos of burning candle wicks. I used a second Mental Ray misss_fast_shader as the base for the candle wick shader; this primarily so the subsurface scattering properties form the candle wax could be duplicated at the base of the wick where the wick is coated in candle wax.
I'll go through the optical properties and algorithm control for the candle's wick below.
Candle Wick Diffuse Colour
 The diffuse colour (the colour of the light that is reflected diffusely from the surface; light that hits a surface; does not penetrate and is reflected at many different angles) for the candle's wick is controlled by a 2D Ramp mapped to the diffuse attribute of the misss_fast_shader:
ramp.outColor > misss_fast_shader.diffuse_color
ramp.outAlpha > misss_fast_shader.diffuse_colorA
The above allowing the three main sections of the candle wick's diffuse colour attributes to be defined separately:
- The wax covered lower section of the candle's wick.
- The black string like centre section of the candle's wick where wax has been melted off and the wick burnt.
- The frayed and burning red, orange and white coloured tip of the candle's wick.
I set the wax covered lower section of the candle's wick to H52 S0.199 V0.886; the same cream colour I used for the diffuse colour of the candle wax shader. The black string like centre section of the candle's wick I set to H0 S0 V0.080; a very dark grey. The frayed and burning red, orange and white coloured tip of the candle's wick I set to H55 S1.0 V1.0; bright yellow being a midpoint between the red, orange and white colours of the candle wick's tip.
Candle Wick Diffuse weight
The diffuse weight I set to 0.450, as per the candle wax shader diffuse weight.
Candle Wick Specular Shader
 Similar to the candle wax the candle wick's specular attributes are not consistent across the surface of the wick. To replicate this I created a second 2D Ramp and mapped this to the specular attribute of the misss_fast_shader:
ramp.message > misss_fast_shader.specular_illum
The colour entry list positions set to match those of the 2D Ramp created for the Diffuse Colour of the misss_fast_shader (defining the three main sections of the candle wick: wax covered lower section, black string like centre section, frayed and burning tip).
For the specular shading of the wax covered lower section of the candle wick I used a Blinn shader and mapped this to the first of the 2D Ramp's colour entry list positions:
blinn.outColor > ramp.colorEntryList[0].color
The specular shading attributes set as below - as you'd expect identical to the specular shading attributes for the inner molten wax crater of the candle (attributes not listed set to 0 or black as I only needed the specular component):
Eccentricity: 0.450
Specular Roll Off: 0.750
Specular Colour: H58 S0.302 V0.882
Reflectivity: 0.095
Reflected Colour: H58 S0.302 V0.882
For the specular shading of the black string like centre section of the candle wick where wax has been melted off and the wick burnt, I again used a Blinn shader; mapped to the second and third of the 2D Ramp's colour entry list positions:
blinn.outColor > ramp.colorEntryList[1].color
blinn.outColor > ramp.colorEntryList[2].color
The above replicating the orange reflection of the candle flame from the wick's centre section. The specular shading attributes I set as below (attributes not listed set to 0 or black):
Eccentricity: 0.350
Specular Roll Off: 0.415
Specular Colour: H44 S1.0 V1.0
Reflectivity: 0.095
Reflected Colour: H44 S1.0 V1.0
Although not truly specular, I added a specular component to the frayed and burning red, orange and white coloured tip of the candle's wick to mimic the white hot highlights. I used a Blinn shader mapped to the fourth of the 2D Ramp's colour entry list positions:
blinn.outColor > ramp.colorEntryList[3].color
The specular for the tip of the wick quite sharp and white in colour mimicking the small white hot areas of the burning wick. The specular shading attributes for the tip of the candle wick I set as below (attributes not listed set to 0 or black):
Eccentricity: 0.250
Specular Roll Off: 0.750
Specular Colour: H0 S0 V1.0
Reflectivity: 0.095
Reflected Colour: H0 S0 V1.0
Candle Wick Front SSS Colour
 As with the diffuse and specular components of the candle's wick, there are 3 well defined sections for the Front SSS Colour:
- The wax covered lower section of the candle's wick.
- The black string like centre section of the candle's wick where wax has been melted off and the wick burnt.
- The frayed and burning red, orange and white coloured tip of the candle's wick.
To separate the 3 sections I used a 2D ramp with colour entry list positions set to match those of the 2D Ramp created for the Diffuse Colour and Specular Shading of the candle wick's misss_fast_shader, then mapped this to the Front SSS Colour attribute of the misss_fast_shader shader:
ramp.outColor > misss_fast_shader.front_sss_color
ramp.outAlpha > misss_fast_shader.front_sss_colorA
For the wax covered lower section of the candle's wick I mapped the procedural 3D Stucco textures created for the Front SSS Colour of the candle's wax to the first of the 2D Ramp’s colour entry list positions:
stucco.outColor > ramp.colorEntryList[0].color
The black string like centre section of the candle's wick; defined by ramp.colorEntryList[1].color and ramp.colorEntryList[2].color; I set to H0 S0 V0.080.
To shade the frayed and burning red, orange and white coloured tip of the candle's wick I used a combination of a 3D Solid Fractal texture and a 2D Ramp texture, the former mapped to the fourth of the 2D Ramp's colour entry list positions:
solidFractal.outColor > ramp.colorEntryList[3].color
I set the attributes for the 3D Solid Fractal texture to:
Threshold: 0.000
Amplitude: 1.000
Ratio: 1.000
Frequency Ratio: 1.712
Ripples: 1.0, 1.0, 1.0
Depth: 0.0, 8.0
Bias: 0.0
Inflection: off
Animated: off
Default Colour: H0.0 S0.0 V0.5
Colour Gain: defined by 2D colour ramp
Colour Offset: H20.0 S0.955 V0.784
Alpha Gain: 1.000 Alpha Offset: 0.000
I then mapped the 2D Colour Ramp to the 3D Solid Fractal texture:
ramp.OutColor > solidFractal.colorGain
I set the attributes for the 2D Colour Ramp texture to:
Type: U Ramp
Interpolation: Spike
Colour Entry Position [0] Position: 0.435
Colour Entry Position [0] Colour: H13.0 S0.955 V0.784
Colour Entry Position [1] Position: 0.585
Colour Entry Position [1] Colour: H55.0 S1.0 V1.0
Colour Entry Position [2] Position: 0.6
Colour Entry Position [2] Colour: H55.0 S1.0 V1.0
Colour Entry Position [3] Position: 0.735
Colour Entry Position [3] Colour: H13.0 S0.955 V0.784
Colour Entry Position [4] Position: 1.0
Colour Entry Position [4] Colour: H55.0 S1.0 V1.0
All other attributes for the 2D Colour Ramp were left as default. I then used the 2D Texture Placement Node for the 2D Colour Ramp texture to repeat the 2D Ramp texture across the 3D Fractal texture:
Repeat UV: X26.0, Y1.0.
Candle Wick Front SSS Weight
The Front SSS Weight I set to 0.550, as per the candle wax shader Front SSS Weight.
Candle Wick Back SSS Colour
 The setup for the candle wick's Back SSS Colour is very similar to the setup for the candle wick's Front SSS Colour. I mapped a 2D ramp with colour entry list positions set to match those of the 2D Ramp created for the Front SSS Colour attributes of the candle wick's misss_fast_shader to the Back SSS Colour attribute of the misss_fast_shader shader:
ramp.outColor > misss_fast_shader.back_sss_color
ramp.outAlpha > misss_fast_shader.back_sss_colorA
The only difference for the Back SSS Colour being that I mapped the procedural 3D Stucco textures created for the Back SSS Colour of the candle wax to the first of the 2D Ramp's colour entry list positions:
stucco.outColor > ramp.colorEntryList[0].color
Candle Wick Back SSS Weight
The Front SSS Weight I set to 0.750, as per the candle wax shader Back SSS Weight.
Candle Wick Front SSS Radius
The Front SSS Radius controls the distance that light can scatter along the front of the candle wick geometry. I set the candle wick Front SSS Radius to 5.000.
Candle Wick Back SSS Radius
The Back SSS Radius controls the distance that light can scatter along the back of the candle wick geometry. I set the candle wick Back SSS Radius to 5.000.
Candle Wick Surface Deformation using misss_fast_shader Displacement Mapping
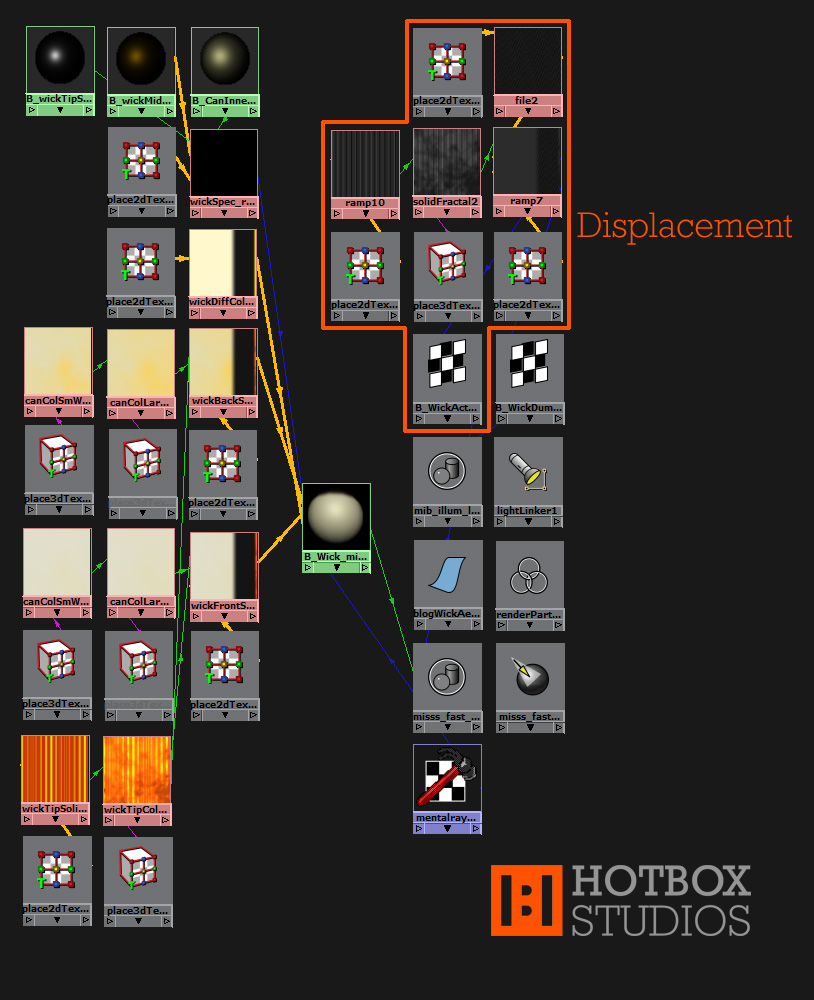 The deformation of the candle's wick falls into three sections as per the colour and specular attributes:
- The smooth wax covered lower section of the candle's wick.
- The string like centre section of the candle's wick where wax has been melted off.
- The frayed tip of the candle's wick.
To add displacement mapping to a misss_fast_shader you need to first select the misss_fast_shader in the Hypershade and click the Input and output connections button. You can then select the Shading Group node for the misss_fast_shader. In the attribute editor under the Shading Group Attributes tab you will see a slot for Displacement Mat.
Into the Displacement Mat. slot I mapped a 2D ramp with colour entry list positions set to match those of the 2D Ramps created for the Diffuse Colour, Specular Shading, Front and Back SSS Colour attributes of the candle wick's misss_fast_shader. So in your Hypershade you should now have:
ramp.outAlpha > displacementShader.displacement
displacementShader.displacement > misss_fast_shader3SG.displacementShader
The lower section (ramp.colorEntryList[0].color) of the 2D Ramp texture - the smooth wax covered section of the candle's wick - I set to H0.0 S0.0 V0.175.
The middle of the ramp which defines the deformation for the string like centre section of the candle's wick where wax has been melted off I mapped to a 2D File texture:
file.outColor > ramp.colorEntryList[1].color
file.outColor > ramp.colorEntryList[2].color
The image for the 2D File texture I created in Adobe Photoshop - a low contrast flat rope / string like texture.
To define the top of the ramp; the deformation for the frayed and burning tip of the candle's wick; I used an identical combination of 3D Solid Fractal texture and a 2D Ramp texture as used for the candle wick's Front and Back SSS Colour:
solidFractal.outColor > ramp.colorEntryList[3].color
I set the majority of attributes for the 3D Solid Fractal texture used to produce the candle wick's surface deformation to those used for the candle wick's Front and Back SSS Colour 3D Solid Fractal texture. The only differences being the Colour Gain and Colour Offset attributes which I set as below:
Colour Gain: defined by 2D colour ramp below
Colour Offset: H20.0 S0.0 V0.1
I then mapped the new 2D Colour Ramp to the 3D Solid Fractal texture:
ramp.OutColor > solidFractal.colorGain
I set the attributes for the 2D Colour Ramp texture to:
Type: U Ramp
Interpolation: Spike
Colour Entry Position [0] Position: 0.435
Colour Entry Position [0] Colour: H0.0 S0.955 V0.150
Colour Entry Position [1] Position: 0.585
Colour Entry Position [1] Colour: H0.0 S0.0 V0.275
Colour Entry Position [2] Position: 0.6
Colour Entry Position [2] Colour: H0.0 S0.0 V0.275
Colour Entry Position [3] Position: 1.0
Colour Entry Position [3] Colour: H0.0 S0.0 V0.050
All other attributes for the 2D Colour Ramp were left as default.
I again then used the 2D Texture Placement Node for the new 2D Colour Ramp texture to repeat the 2D Ramp texture across the 3D Fractal texture:
Repeat UV: X26.0, Y1.0.
Lighting the candle wax and candle's wick using Image-based Lighting (IBL)
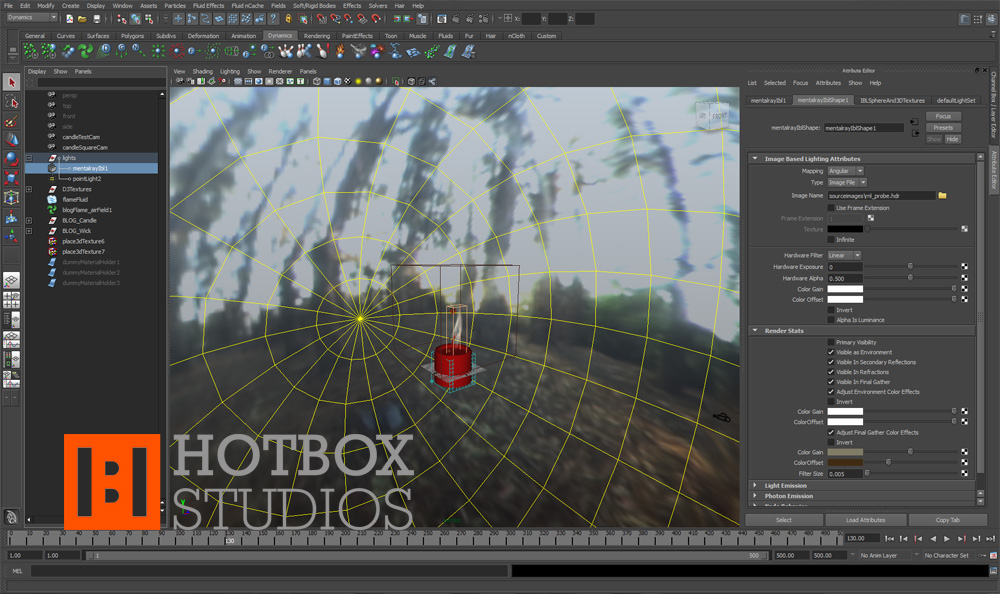 I used Image-based lighting (IBL) to simulate environmental lighting for the candle. With Image-based Lighting you use an image file to illuminate the scene. Typically the high-dynamic range (HDR) image is produced by taking photographs of a chrome ball (known as an image probe) within a similar or identical real-world environment to that of your virtual scene.
As this tutorial isn't focused around Image-based lighting techniques I won't go into a huge amount of detail about IBL. You can find information about setting up Image-based Lighting in the Autodesk Maya help documents.
You can find more information and downloadable HDR Light Probe images on the University of Southern California's Institute for Creative Technologies' website.
If you are interested in creating your own HDR Light Probe images there is a wealth of information on the University of Southern California's Institute for Creative Technologies' website.
The only other light source within the scene is a point light above the candle which mimics the light emitted by the candle's flame. The colour of the point light I set to H51.0 S0.369 V1.0, the intensity I animated between 0.6 and 0.8 to mimic the flicker produced by the candle being blown by a light air field.
Rendering the candle wax and candle wick using Mental Ray and RenderPal
I used Mental Ray for Maya to render the candle. I'll detail only those attributes I changed from default below:
Common > File Output
Image format: TIFF (tif)
Frame/Animation ext: name.#.ext
Frame padding: 5
Common > Renderable Cameras
Renderable Camera: Your render camera
Alpha channel (Mask): yes
Common > Image Size
Width: 1600
Height: 1600
Resolution: 72
Device aspect ratio: 1.0
Pixel aspect ratio: 1.0
Common > Render Options
Enable Default Light: off
Features > Rendering Features
Final Gathering: yes
Quality > Anti-Aliasing Quality > Raytrace/Scanline Quality
Max Sample Level: 3
Quality > Anti-Aliasing Quality > Multi-Pixel Filtering
Filter: Gauss
Filter Size: 3.0, 3.0
Quality > Raytracing
Reflections: 10
Refractions: 10
Max Trace Depth: 20
Quality > Framebuffer
Colorclip: RGB
NB: this setting is fairly hidden away and makes a big difference when compositing so make sure you have a read of the help docs and test the different settings to find which is best for your animation.
Indirect Lighting > Final Gathering
Final Gathering: yes
I left the rest of the Final Gathering options as default.
Once the scene was setup for rendering I used Render Pal to manage the render process. Render managers come into their own when you're rendering more complex scenes across multiple computers; so rendering via a render farm. That said, even if you're only rendering a single simple scene on a single computer it's still good practice to use a render manager. The basic version of Render Pal is free and will allow you to control your render far more than if you rendered from Maya or the command line. The email notifications are also very useful - letting you know the progress of the render whilst you're away from your desk.
Compositing the candle into an environment using Adobe After Effects
To finish the animation I used Adobe After Effects to composite the candle into its environment. For the original project this was a relatively complex task involving hundreds of layers due to the animation being presented in 49 different cells within a single HD projection.
Info about the animator Mark Hatchard
Mark Hatchard studied BA (hons) Computer Visualisation and Animation at the National Centre for Computer Animation (NCCA); part of Bournemouth University's Media Department.
Mark is currently a Director at Hotbox Studios Ltd.
Friday, February 13, 2015
Call us
01252 849600 (UK)
+441252 849600
(International)
Email us
info@hotboxstudios.co.uk
or use our contact form